The first step in mold remediation is to halt any further growth. This includes fixing the source of any water damage, turning off the power to the affected areas and wearing protective clothing like a respirator mask, goggles and gloves.
Next comes cleaning and sanitation. This includes disinfecting hard surfaces with antifungal and antimicrobial cleaners. Soft surfaces and porous materials are discarded in plastic bags to avoid spreading any mold spores.
Mold is a serious problem that can cause structural damage and health problems. It is very important to clean and dry all affected areas immediately. Mold spores can cling to walls, carpets and other surfaces and continue to grow until they are removed or the moisture is controlled. If left unattended, black mold spores can spread rapidly and cause a variety of health problems for those exposed, including respiratory distress, skin rashes, eye irritation, coughing and sneezing.
The most common method for removing mold is to dry out the moldy materials. This is also called decontamination. If the area is large, you may need to hire professional help to do this. However, small areas can be done with common household cleaners.
When dealing with walls, you need to use a few different cleaning methods depending on the type of material. Generally, paint and wallpaper are the most difficult to remove mold from.
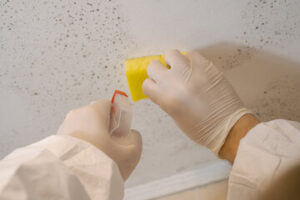
Using a scrub brush or sponge, apply the cleaning solution to all of the moldy areas on the wall. Allow the solution to sit on the surface for about 10 minutes and then scrub and wipe the area. Repeat as necessary until the area is completely free of mold stains.
If you have drywall that is damaged by mold, it is possible to remove the contaminated sections and replace them with new drywall. A professional mold remediator will have experience with this process.
You can also try to remove the mold yourself with a few simple ingredients. First, collect all of the materials you will need. This will include a bucket, a spray bottle, a brush and water, white vinegar and borax. Combine a few teaspoons of water and a tablespoon of borax in the bowl to form a paste. Apply the paste to the moldy areas of your walls and leave it on for about ten minutes. Scrub the area with your brush and then rinse it.
You can also use the same process to remove mold from fabrics. Mix equal parts of white vinegar and water in a bucket to create a solution. Soak the moldy fabric in this solution, allowing it to soak for 30 minutes to an hour. If the fabric is delicate or you are worried about the odor of the vinegar, you can dilute it further by adding a little bit of cold water to the solution.
Containment
When it comes to mold removal, containment, or limiting the spread of contaminants during cleanup is one of the most important first steps. This means sealing the work area to minimize the exposure of building occupants and remediators to mold spores. Containment usually includes covering the work area with polyethylene sheeting, and if necessary excluding the contaminated zone from airflow by closing vents, doors, chases and risers to other areas of the building.
During the containment process, it’s also a good idea to wear personal protective equipment, such as an N-95 mask and disposable gloves. It’s also recommended that all exposed clothing be removed and laundered or discarded before entering the work area.
A variety of cleaning agents may be used during the mold remediation process, depending on the type and severity of the problem. In many cases, surface-level mold can be cleaned using simple methods such as scrubbing or spraying with detergent solutions.
Absorbent or porous materials that become moldy, such as carpet and drywall, will need to be removed and replaced. This step can be expensive, but it’s vital to avoid further damage and health hazards from the mold spores that can continue to grow after the contaminated material has been removed.
Heavy mold growth in water-damaged buildings often involves Stachybotrys chartarum, or “black mold.” This type of mold typically grows in drywall and wallpaper and is commonly found in basements, attics and cooling systems. It appears greenish-black and has a musty or earthy smell.
Other common molds that can grow in water-damaged buildings include Penicillium, a diverse genus of over 300 species. This mold grows on food products and may appear as green, brown or black spots on walls and ceilings. It can also grow in ductwork, ceiling tiles and insulation material.
Another common mold in water-damaged buildings is Fusarium, a fungus that often appears as brown or grayish-black and can affect wood fibers and even cause dry rot. This type of mold can release toxic toxins that can irritate the nose, eyes and throat. It can also produce a fungal compound that can be irritating to the skin and nails.
Cleaning
The next step in the remediation process is cleaning, or removing mold. Surface mold is easy to clean with standard household products. But the underlying issue that caused the mold is not. Mold spores will return quickly if the original cause of the problem has not been addressed.
This is why it is so important to fix any water leaks as soon as possible and dry all materials and surfaces thoroughly. Often, surface mold is a telltale sign of a bigger problem that may involve a sewage backup or foundation cracks.
To remove mold from hard surfaces, simply scrub with a mixture of soap and water or bleach. Bleach should be diluted at a ratio of 1 cup of bleach per gallon of water. Mix well, and spray or wipe the area to kill and remove the mold spores. If using bleach, be sure to use a high-filtration mask and rubber gloves to protect your eyes, nose and mouth. Vinegar is a natural mold killer that also works well on most hard surfaces. Just be sure that you do not use it on stone, aluminum or iron surfaces as the acid will damage them.
When cleaning drywall, carpeting or other soft or porous materials that have been affected by mold, it is essential to follow the steps outlined in the EPA’s Mold Remediation Guidelines. These include fixing any water damage, washing and rinsing the affected material with an antifungal cleaner, and then drying it completely. It is often necessary to replace contaminated materials with new ones that are made from an absorbent and/or porous material such as wood or drywall.
Be sure to clean and disinfect any tools you use for cleaning or scrubbing, as mold spores can be reintroduced into the air. It is also a good idea to wear long-sleeved clothing and rubber gloves while working, and to open windows and use fans to circulate the air. This helps keep the spores from spreading to other areas of your home.
Disposal
While you can clean up small areas of mold with a brush and store-bought cleaners, it’s usually best to have a professional handle larger jobs, especially ones involving toxic black mold (Stachybotrys chartarum). Remediators know how to remove mold-damaged building materials without dispersing spores throughout the house. And they can address the underlying moisture problem, which will prevent future growth.
The remediation process starts by determining the contamination area. If you have a large, widespread mold problem, the team will follow the recommendations in EPA’s Mold Remediation in Schools and Commercial Buildings. For smaller projects, the team will follow guidelines from other professional or government groups.
Once the work area has been isolated, a crew member will remove non-porous building materials such as drywall, carpeting and insulation. They will then clean and disinfect all surfaces. The contaminated surfaces are misted with detergent solutions and scrubbed to ensure all mold is removed. Then, they are placed in plastic bags and sealed. The outside of the bag is wiped down to reduce the chance of spores being dispersed into the air during removal.
The contaminated building materials are then disposed of. The team will also take measures to dry the affected area. They may use dehumidifiers, fans or other methods to speed up the drying process. They will also check the humidity level and make sure it meets a specific range to prevent new mold growth.
If the remediation company finds a problem that needs to be fixed, such as a loose bathroom fan duct that could cause a sand-like dust to form in the attic, they will repair it. Then, they will apply biocide/fungicide/moldicide solutions to help prevent mold re-growth.
It’s impossible to completely eliminate all mold spores in the air. However, the goal is to get the spores to a level that is safe and healthy for you and your family. A professional mold inspector can determine whether a home has reached this level, which is referred to as “normal fungal ecology.”